LED Ball Lights
Hello all! This projectable will teach you how to make hanging LED ball lights.
I'm very sorry about the quality of both the pictures and the Ible itself... I promise to do better next time ;)
I'm very sorry about the quality of both the pictures and the Ible itself... I promise to do better next time ;)

Step 1 Materials
Okay, you'll need:
**Click on any picture below to enlarge it and to see a description**
- Scissors
- An X-acto knife, or pocket knife
- A foam ball, like the ones sold at craft stores. Whatever size you like
- Hot glue gun, and glue stick
- A few feet of wire, both red and black. (Or other color combinations if you like, just remember which is positive and which is negative)
- A 9v battery, and snap.
- Plastic wrap
- A full roll of packing tape
- LEDs, any color and amount you like. (As long as you can power them with a 9v battery, or get a AA battery holder)
- Soldering iron, and solder.
- Electrical tape
- Fine grit sandpaper. (from 320 - 400)
- A snack! (Optional, but I was really hungry while making this)
**Click on any picture below to enlarge it and to see a description**


Step 2 Make the Balls
So, take the foam ball and wrap it with plastic wrap. Make sure you cover the whole thing with it, so there are no foam spots. Then, take the packing tape and wrap the whole thing with it, in one long continuous piece of tape. Wrap it so the whole thing is about 8-10 layers thick (More never hurts, and won't effect the light if you have bright LEDs). Now take your knife, and cut down the middle of the ball, almost all the way to the other side, but leave about 1-2 inches uncut. Peel the tape ball away from the foam ball. If you want to, you can peel the plastic wrap off the inside of the ball. This makes it a bit clearer, but if you like it more diffused then you can leave it in. Now tape the ball back together by using strips of tape along the seam. Try and get the seam as close together as you can. You've now finished ONE, count em' ONE tape ball. Repeat for however many tape balls you need.
P.S.! You can use this "molding" method to make other shapes. Say, a banana. Just make sure you're okay with cutting into the object before you tape it up!
**Click on any picture below to enlarge it and to see a description**
P.S.! You can use this "molding" method to make other shapes. Say, a banana. Just make sure you're okay with cutting into the object before you tape it up!
**Click on any picture below to enlarge it and to see a description**


Step 3 Diffuse and wire the LEDs
This will be the step that will make you want to hurt me it's so bad... =/
Okay, take the sand paper, and your LEDs, and go to town sanding them. Sand them enough so you can't see into them anymore.
Now, on to wiring them. Since I'm using three 3v LEDs I'm putting them in series without a resistor (I know.. I know.. It's always good to have one... But I didn't). Cut about 6, 6 inch pieces of wire, and go from the negative leg of the first LED, to the positive leg of the last LED. Cut a shorter piece, and solder it to the positive snap wire, then to the positive leg of the first LED. Then a long piece of wire that goes from the negative leg of the last LED to the negative wire on the snap. If you need help, look at the poorly made (by me) diagram in the second picture. Notice how, if it were upside down, the LEDs would be hanging? Try and solder it so they hang like that.
Test them before going any further. Plug in the 9v, you got light? Then you're golden!
Once you're done, put electrical tape around all the solder joints, except the LED legs.
**Click on any picture below to enlarge it and to see a description**


Step 4 Putting the LEDs in the balls
Now get your knife again, and make a little slit along where you re-taped the ball, then poke the LED into it, and hot glue it in. Try and get hot glue in between the legs of the LEDs, so the don't short against each other. Make sure the LED is pointing straight into the ball, and it's not at an angle pointing towards the side.


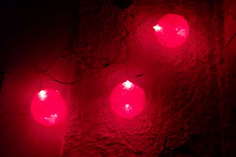
Step 5 Finish!
You're done!!! Now hang them somewhere!
I hope you liked it, and have fun with your lights!
And again, sorry about any bad pictures, or instructions.
I hope you liked it, and have fun with your lights!
And again, sorry about any bad pictures, or instructions.