Add El Wire to a Hat


Step1
-Supplies
Okay, you'll need:
-Supplies
Okay, you'll need:
- A hat, I used a cheap felt top hat
- Scissors
- An awl
- El wire kit. I bought mine from Thats Cool Wire. Link to the kit I bought: http://www.thatscoolwire.com/store/item.asp? Category=168&SubCategoryID=124&GroupID=&SKU=WY-NH-LZ-3V You'll need enough for the rim of the hat your working on. (Or whatever design your doing)
- To attach the battery pack to the inside of the hat, I used a piece of stick on velcro. (The hook side)
- A needle, and fishing line. (I used two really long pieces, I ran out the first time.)
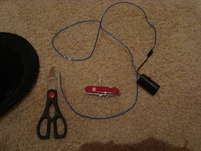
-Pocket knife with awl -Scissors -EL wire kit
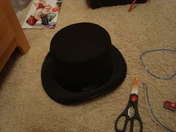
Felt Hat
Step2
-Prep the hat
Okay, take your awl (Or you could use a nail) and poke a hole at the base of the hat. (See picture)
Make sure your hole is big enough for the wire to fit through.
-Prep the hat
Okay, take your awl (Or you could use a nail) and poke a hole at the base of the hat. (See picture)
Make sure your hole is big enough for the wire to fit through.
Poke a hole with your awl or a nail.
Step3
-Attach wire to hat.
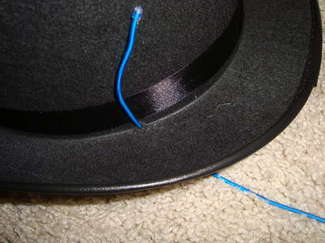
Now, first attach the battery pack to the inside (If you have room) or somewhere else, I attached it to the inside using velcro since the hat is felt. Then take your fishing line, get about the length between you arms when the line is folded in half, the thread it through the needle, and tie the ends together. Then, Whip-stitch the wire onto the rim. If you don't know how to whip-stitch, you can kind of see from the picture, or look up how to on here. This part takes the longest... =/ But if you do it right, then it holds really well. When you reach the end, poke another hole in the brim and push the left over wire through, (See pic 3.) Then, cut the excess wire off, then take a piece of heat-shrink wire, or electrical tape, and cover the end.
-Attach wire to hat.
Now, first attach the battery pack to the inside (If you have room) or somewhere else, I attached it to the inside using velcro since the hat is felt. Then take your fishing line, get about the length between you arms when the line is folded in half, the thread it through the needle, and tie the ends together. Then, Whip-stitch the wire onto the rim. If you don't know how to whip-stitch, you can kind of see from the picture, or look up how to on here. This part takes the longest... =/ But if you do it right, then it holds really well. When you reach the end, poke another hole in the brim and push the left over wire through, (See pic 3.) Then, cut the excess wire off, then take a piece of heat-shrink wire, or electrical tape, and cover the end.


Step4
-Finished!
Your finished!! Add a battery, turn it on, and admire your work!!
Sorry if this isn't as descriptive as it could be, please check out
Thanks!!!
-Finished!
Your finished!! Add a battery, turn it on, and admire your work!!
Sorry if this isn't as descriptive as it could be, please check out
Thanks!!!
This project is owned by Zem. All credit is given to the owner and this project and its pictures are copy righted by Zem.
This project along with it photos are used with permission.
