25¢ Silver Ring
Intro
Make a silver ring for 25 cents
Do you have a quarter from 1964 or before? If you do, it is made of silver. You can turn that coin into a nice silver band using a spoon, a drill, and a metal file.A quarter will yield a small ring, size -7 or less. You can get a larger size but the ring will be very skinny. If you want a larger size ring, a Kennedy half dollar will work well. Again, anything 1964 and earlier will be silver.
Materials needed: Optional but Recommended
-Silver quarter -Vice Grips
-spoon -Dremel Tool
-drill
-metal file
-Silver quarter -Vice Grips
-spoon -Dremel Tool
-drill
-metal file
Step 1
Find a silver quarter
I was lucky enough to find two silver quarters in my change, but unless you are looking, you may not find one. Any quarter from 1964 and earlier should be silver. They are much lighter in color than newer quarters. I've read you can use the the sandwiched coins, but the metal is harder and it wouldn't be a silver ring. You can also buy one at a coin dealer for a couple dollars.
DO NOT buy an expensive silver coin for this, you will be destroying it.
Make sure that you don't see any copper!
Step 2
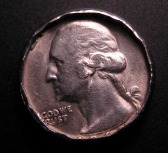
Start tapping
Now comes the tedious part. Hold the coin with one hand and tap the edge with a spoon. Turn the coin as you tap. Tap Tap Tap. Tap the ring in the center of the edge as much as possible. This will keep the edges of the ring from bending under.
**Do your tapping when no one is around, the tapping can get very annoying to others in the nearby vicinity.**
The more you tap the faster the ring will form. I was a casual tapper, I tapped while I watched TV. My first ring took a year to finish. If you're the impatient type you can speed up the process by using a hammer and a hard surface. If you do this you risk bending or warping the coin and your finished ring will look crude and rough. The small taps of the spoon give a much smoother beveled look.
Avoid tapping the edge to prevent it from bending under.
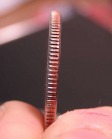
As you tap, the coin gets smaller and the edge gets thicker
As you tap, the coin gets smaller and the edge gets thicker
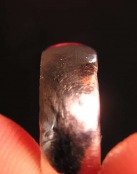
Notice the round edge. You get this by just using the spoon. If you wanted a flat edge you would have to set the quarter on something hard like an anvil while you tapped it.
Aim the spoon for the center of the edge.
Aim the spoon for the center of the edge.
Step 3
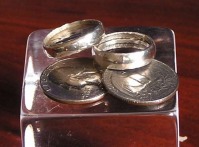
Size your ring
As your ring starts to form you will need to determine the size you need.
Tap the ring until you ring size is pretty close. You can be off by a 1-2 mm because there will be extra space in the center to play with.
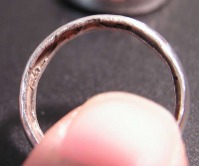
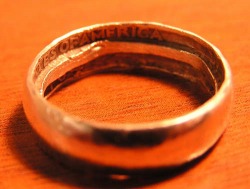
When you reach about size 6 you can see the date and the words "Liberty", "Quarter Dollar", and "United States Of America" on the inside of the ring. This will be your only proof that you made this from a quarter. This site will convert your ring size to inches or mm.
Size your ring
As your ring starts to form you will need to determine the size you need.
Tap the ring until you ring size is pretty close. You can be off by a 1-2 mm because there will be extra space in the center to play with.
When you reach about size 6 you can see the date and the words "Liberty", "Quarter Dollar", and "United States Of America" on the inside of the ring. This will be your only proof that you made this from a quarter. This site will convert your ring size to inches or mm.


Step 4
Make a hole
This part was the hardest for me because I didn't have anything to hold the ring while I drilled it. You need to hold the ring in something that won't scratch it. A vice or vice grips. What ever you use, make sure you pad it to protect the ring. You don't want all that tapping to go to waste.
I drilled a hole in the center followed by a bigger hole and so on. Drill out as much of the center as you can. A dremel will probably work well here. I didn't have one for my first ring. Once you have enough of the center out you can grind away the edges with a file or dremel.
At this point you can play around with the size. Try the ring on and grind away until it fits right.
Step 5
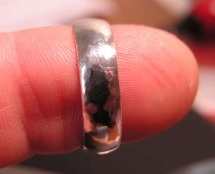
Polish your new ring
I found that the small taps from the spoon gave a nice polished look already. You can use the dremel to clean out any rough areas inside the ring. If you opted for the quick and dirty hammer method you may need to polish the outside of the ring. I suggest several rounds of polishing, coarse --->fine grit.
After that you are done.
Step 6
What to do with your new ring?
Wear it, propose marriage, sell it, give it away. Sadly you can never use it to play a video game or spend it like a quarter, but I think it's worth much more than 25 cents now.
I hope you give it a try. It's really very easy.
What to do with your new ring?
Wear it, propose marriage, sell it, give it away. Sadly you can never use it to play a video game or spend it like a quarter, but I think it's worth much more than 25 cents now.
I hope you give it a try. It's really very easy.
This project is owned by target022. All credit is given to the owner and this project and its pictures are copy righted by target022.
This project along with it photos are used with permission.
You can view the origional project at: here.
This project along with it photos are used with permission.
You can view the origional project at: here.
